Migrating Your Contact List in AMPLY

Knowledge Base Hub > ​Migrating Your Contact List in AMPLY

How To Import Contacts

Importing a comprehensive contact list is a cornerstone of effective database management. When done correctly, it ensures your contacts are organized with the best data, facilitating more efficient business operations.

IMPORTANT: If you're not an Admin User, you won't have the ability to import/export contacts. You can adjust your User Settings by visiting: Settings > My Staff > Team Management.

How to Import Contacts to the CRM:

A .csv file with the contacts you want to import
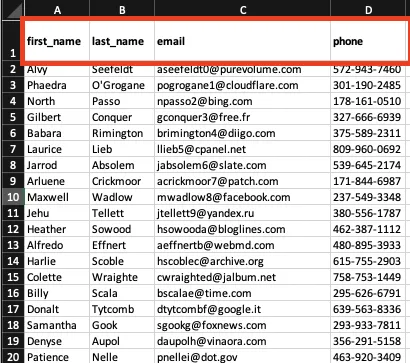
Step 1: Prepare Your .csv File

Row 1 of the file should have essential headers such as ‘first name’, ‘last name’, ‘email’, ‘phone’, ‘additional phones’, ‘tag’, and so forth.

When adding multiple phone numbers for a single contact, list them in the "additional phones" column. This feature allows you to manage multiple phone numbers seamlessly.

Format phone numbers correctly. If a "+" sign is required, add an apostrophe at the start (e.g., '+191668128779').

Avoid using File Upload and Signature Fields in the import.

For DND columns, remember that contacts will be set to DND for all channels unless specified otherwise through workflows and tags.

Clean your list and check for duplicates before importing. This is crucial for maintaining data integrity and avoiding deliverability issues.

Step 2: Import Your Contacts

Two options exist for adding contacts:

Manually create a contact by clicking the “+” sign in the top left corner.

Or, use the import icon (an upward-pointing arrow) to introduce contacts via your .csv file. Choosing “Import Contacts” lets you batch-import, which is both time-efficient and effective.

If the Import/Export icons are not visible, ensure that a user profile has been created under Settings --> Team Management. Need help? Please Contact Support.

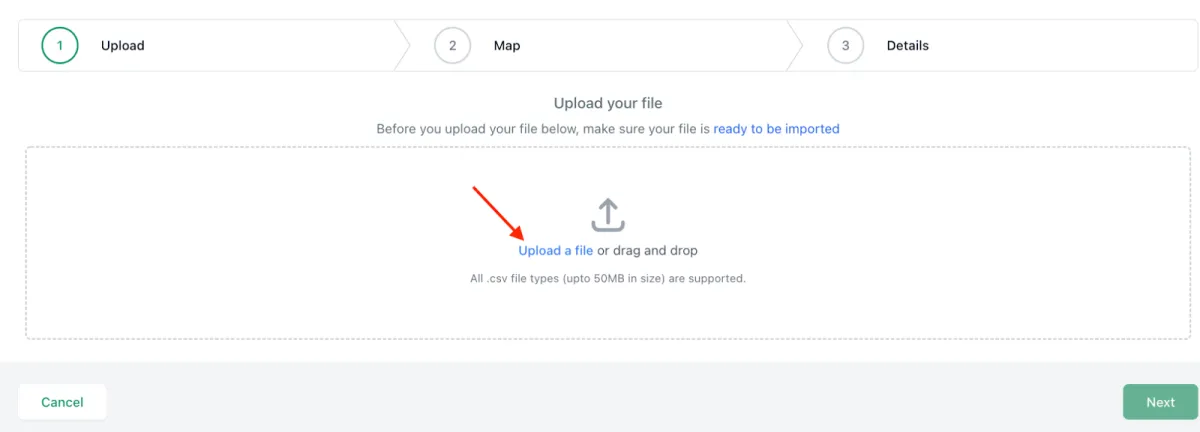
Click “Upload a file” or use drag-and-drop.

Map fields to specify how the data will fit into ’s fields.

A green check indicates a ready-to-import field.

"Column Header From File" denotes which .csv column gets imported.

"Contact Fields" indicates the target field in . Most general fields are automatically recognized. Manual mapping might be necessary for custom fields or unconventional headers.

The "Additional Phones" column can be mapped for importing multiple phone numbers. Separate them using commas, slashes, or semicolons alongside the primary “Phone” number column.

For multiple emails, separate them and map them to the "Additional Emails" field.

Proceed to tab 3:

Assign an import name or let default to a date-time format.

Opt to create a “Smart List” for these contacts, if desired.

Under the “Advanced” tab, you can:

Decide on a strategy for duplicates.

Add tags or decide the criteria for identifying duplicates.

Activate the “Add to Workflow/Campaign” option if needed.

Validate emails (charges might apply).

Finalize by clicking 'Submit'.

Please Note that the Add to Workflow/Campaign toggle only works for new contacts, not for updates via CSV.

Use the Contact ID as a unique identifier (The Find Existing Contacts Based on Dropdown) if the CSV lacks email and phone numbers.

Contact Us

Need help with your AMPLY account?

Join our Community!

Connect with thousands of AMPLY users just like you!